Tuesday, September 20, 2011

September Release and Quick Quotes Winners!

Hello everyone and since we are late in posting these winners, I want to keep this short and sweet. :)

Thanks so much to everyone who participated in the September Release hop and our co-hop with Quick Quotes Scrapbook Company! You guys are AMAZING and we had a blast showing you our creations.

So without further ado...here are the winners!

September Release
Winners:


PK-646 Faceless Fun 2
Shar said...
Thank you for posting a link to the instructions for the Treat Box!!!! I am always looking for ideas for Treat giving!!! Your Creations are so much fun!!!
Thank you for Sharing Aloha, Shar


PK-647 Faceless Fall Fun
Gabriela Sandoval said...
These are awesome. Thanks for sharing.
Gaby@hispaniclifestyle.com
PK-648 Faceless Scarecrow Dolls - Large
Rene said...
What an awesome stamp release!!! Congrats on 9 years! Can't wait to see the rest of what everyone has done! Corinne ronnieandcorinne@sbcglobal.net
PK-649 Scarecrow Accessories
Patti Ross said...
I am just speechless. This is truly a work of art, as well as a labor of love. How precious. I'm inspired to make one for my grand-daughters and a million thanks for your inspiration - and incredible talent. I am humbly a follower...
Patti
www.pattilynncreations.com
rossfam@wildblue.net

PK-442 Happy-Go-Lucky Dog Face Assortment
Kathy's-Krafts said...
Such cute puppies...I love them
kathyskraftsandmore.blogspot.com
kgprevost(at)sbcglobal(dot)net
PK-443 Happy-Go-Lucky Dog Faces 1-1/8"
lanejoy1 said...
Love your work. The dogs are adorable. Thanks for sharing so many good ideas with all of us. lanejoy1@windstream.net

PK-485 In Stitches Face Assortment
Sew Sweet N Crafty says:
OMG, I LOVE this card. The colors are a great combo. The buttons are a CUTE touch. Great job. I want one of the these cards! LOL.
Sew Sweet N Crafty
SewSweetNCrafty.blogspot.com

PK-486 In Stitches 1-1/8" Faces
Richelle said...
Emma , once again amazing work - and so inspirational..Those stitched face stamps are so cute...

And our QUICK QUOTES/PKS BLOG HOP WINNER is....
TOO CUTE! Great for birthday or classroom favors...
Marisol
atouchof_sol at yahoo dot com

Congratulations, everyone!!
Please contact Adrianne (adrianne at peachykeenstamps dot com)
with the following information:
  • First and last name
  • Mailing address including zip code
  • The item that you won (this ensures quick shipping)
Hope you guys enjoyed the hops, thanks so much for joining us! Have a Peachy evening!
:) Angelica

Polka Dot Gypsy - Guest Designer Day 2

Happy Tuesday everyone and welcome to my second day as Guest Designer! Today at Peachy Keen Stamps it's time for another Sketch Challenge. This one was definitely a tough one for me. The overall card was tall and thin. I chose to keep it that way because it was the one element that was a real challenge for me to overcome. It was a very long process with many changes before I came up with this amazing card. I say it is amazing because with all the changes I made to this card it is amazing that it did not get pitched in the trash! "Patched" Pumpkins" is truly a labor of love.

Patched Pumpkins Card


The finished card size is 4" X 9 1/4". The design theme for this card is patchwork. With the arrival of fall weather I am in a quilting mood. So, I created my challenge card with the feel of an old fashioned quilt. And I think that this card does that with it's earthy tones and hints of patchwork.

Stamp Sets

Cardstock Cutting Dimensions
8" X 9 1/4" - Solid Brown for Card (4" X 9 1/4" folded)
3 3/4" X 9" - Solid Rust for Card Mat
3 1/2" X 8 3/4" - Brown & Orange Polka Dot for Design Panel
2 3/4" X 8 1/8" - Solid Tan (Cut to a point) for Card Design Element
4" Solid Brown Circle for Mat
3 3/4" Yellow Print Circle
Scrap - Solid Rust for Pumpkin Mat
Scrap - Brown Check for Pumpkin
Scrap - Tan Print for Patchwork Pumpkin
Scrap - Rust Print for Patchwork Pumpkin
Scrap - Yellow Print for Patchwork Pumpkin
Scrap - Real Wood Thin Cherry Paper for Sign

Tools, Supplies & Embellishments
Cricut
Cuttlebug
Nestabilities Pumpkins Die
Studio g Bat Punch
Crimper
Beads
Buttons
Twine
Felt Flower
Plaid Paper Nut Cups

Creating the Look of Applique


To create the look of applique on this card I paper pieced the small pumpkins. Using the Halloween Pumpkins from Peachy Keen Stamps, I stamped the image onto the checked pumpkin. I also stamped the same image onto each of the three scraps of print cardstock: tan, rust, and yellow.


Each of the small pumpkins were cut out from the scrap pieces and attached to the checked pumpkin background, covering the stamped image on the background.


I faux stitched along the edges of the circle and large pumpkin. Faux stitching is simply fake stitching. I used a marker to achieve the look of stitching. And to make the stitched circle more uniform I cut a smaller circle and used it as a template to follow while inking the stitches.
I love how paper piecing resembles the applique that I use for quilting. It really is a simple technique with a powerful impact on a card.
Keeping with the patchwork theme I added a plaid flower. I love to make flowers of all kinds. And I've shared some of those on Polka Dot Gypsy. I hope you'll check them out. But for this card I am trying out another flower technique. I found these paper nut cups at a craft store and new immediately what I was going to do with them. The flower is made from two of these nut cups and is really simple to make.


To make this flower you will need two small paper nut cups and 1 punched circle of any size as the base. Cut the center out from one of the paper cups. Keep the outer ring and throw away the center. You won't need it. I'll refer to this piece as the donut.


Glue the nut cup to the punched circle, scrunching up the center of the cup.


Next, attach the donut piece to the center, scrunching it up as well. Gently gather in the center edges of the donut so that it fits nicely inside the first nut cup layer.


Add a button or two for the center. Once the glue has dried, shape your flower as desired.


Air Brushing verses Coloring

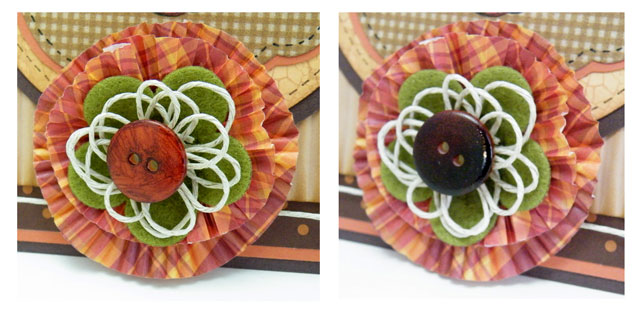
For the flower I wanted a brown button for the center. I didn't have one. So, I used the brush end of my Copic marker to brush on the color, It didn't cover as well as I wanted it to. I used my airbrush and the same marker to color another button. Below is the result. Before on the left and After on the right. Who would have thought that it would make such a big difference.


Rolodex Cards

My second project is a decorative Rolodex card. It can be used the traditional way, keeping important information such as addresses, cell numbers and website information or it can be made into pages for a Rolodex mini album. I'm going to make the mini album to set on my desk.

For this project I cut the Rolodex Cards with my Cricut and faux stitched around the edges. I used double sided cardstock for the card so that I can decorate both sides. I stamped the flower image onto two coordinating prints of cardstock. A 1" circle punch was used to punch out the center of the flower. It was then attached to the center of the coordinating flower. The flower stamp is the Faceless Fall Fun 2 set from Peachy Keen Stamps.


For the back of the card I used the same flower stamp and the same cardstock with the flower and center papers switched for a different look.


This is the perfect stamp to add a face to. This sweet little face is from the In Stitches Face Assortment that I will be drawing for this Saturday. Isn't she just adorable?


Fall Gift Card Holder

For my final project I made this fun little fall gift card holder featuring Halloween Pumpkins, Faceless Fall Fun 2 and the In Stitches Face Assortment stamp sets from Peachy Keen Stamps. The card is made from a small paper bag folded to form a pocket, sewn and decorative panels added. For the front of the card I used the same paper pieced pumpkins that I used for my "Patched Pumpkins" card.


On the back I used the same happy flower from the Rolodex card. 


The card opens up and inside is a pocket to hold a gift card. Please note that the pocket is under the design panel. This photo is misleading. It looks like the pocket is in the flap.


I used a paper bag measuring 4 3/4" X 8 1/2". Folded up the gift card holder measures 3 1/4" X 4 3/4". To make the pocket. just fold the bottom up and stitch along the sides using a sewing machine. Be sure to stitch so that the decorative panels will cover your stitching. Decorate three panels and attach them to the front, back and flap. Secure the ribbon to the bag before attaching the front panel to the bag. Sandwiching the ribbon between the front panel and the bag will hold the ribbon in place and conceal it. On the back I attached the happy flower with pop dots along the upper portion of the flower. This allowed enough room to slide the ribbon up under it before tying. Below is a better photo of the actual pocket. You can see the stitching along the pocket edges.


Wow! I didn't realize I had so much to talk about today. Now, don't forget that on Saturday I'll be drawing a name for the set I've been using today, the In Stitches Face Assortment. Peachy Keen Stamps has so generously donated this stamp set and some lucky winner will get it on Saturday. Will it be you? To win, leave a comment here and on my Patched Pumpkins post at the Polka Dot Gypsy.

I hope you enjoyed today's projects. Again it has been a privilege to share my paper crafting with all of you. Have a wonderful day!

Jane - the Polka Dot Gypsy

Monday, September 19, 2011

Polka Dot Gypsy - Guest Designer Day 1

Good morning everyone. Today begins my week as Guest Designer for Peachy Keen Stamps. I am so excited to be sharing with you all the fun projects that I've been working on. So, lets get started!!!

Tissue Cover


My first project is a decorative cover for the square box of facial tissue. Please note that because of the size of the scarecrow image I had to turn the box on its side. If using a smaller image, the box can be placed in it's normal, upright position. The cover was made with kraft paper used for mailing packages. The tissue box was wrapped and then tied with a ribbon made of brown tulle. The kraft paper was not attached to the box so that replacement boxes can slide easily in and out. Spider web edges were created using the Martha Stewart Spider Web punch. However, the spider web edging has a tendency to catch on the box flaps. So, caution is needed when changing boxes. Below is a photo of the side opening of the tissue cover. You can see how the pointy edges can catch on the tissue box.


For the front panel I stamped the "Happy Scarecrow" image from Peachy Keen Stamps. The image was colored with Copic Sketch markers.


I wanted the scarecrow panel to be the focal point of this project. So, I choose a more plain, patchwork type of panel for the top. I used the Nestabilities Pumpkin die and the Cuttlebug to create this cute polka dot pumpkin. A simple circle punch was used to create the moon and Vintage Photo Distress Ink was used around the edges to add a little dimension to it. I found this cute little bat punch from Studio g. It made the perfect accent for the harvest moon. The final accent is a ribbon tied around the fall paper.


Tools & Supplies

Copic Markers
Ranger Distress Inks
Tuxedo Black Memento Ink
Studio g Bat Punch
Martha Stewart Spider Web Edge Punch
1 1/4" Circle Punch
Nestabilities Pumpkin Die
Cuttlebug
1/4" Off White Ribbon
Strip of Brown Tulle
Kraft paper used for mailing packages
Various solids and patterns of cardstock and paper


Happy Scarecrow Variations


For this card I used the Pumpkin Nestabilities die to cut out the Happy Scarecrow image. For the rick rack I used the Rick Rack die cut from Cottage Cutz.


I used a lot of layers for this card and added some faux stitching around the center panel. The added bow embellishment was made from raffia.


For the final card I machine stitched around the edges of the center panel. The rosette was made using the Tim Holtz Mini Paper Rosette die. The rosette was added to fix a blending experiment gone bad.


Copic Tips

I always loved the results that other crafters were getting using Copic markers and I just had to give it a try. I've been using them for a few years now and still consider myself a beginner. I know the basics and can use them, but alas I am a rebel and tend to break the rules. Sometimes that gets me into trouble. In the case of Copics, I blend colors not in the same family. Most, no probably all, of the blending that I did on this project is outside the blending families. Sometimes it worked and sometimes it didn't. So, here are a couple things that I do to help me when I am using my Copics.

Before I start a new project I like to warm up a little before coloring my actual image, especially if I haven't colored for a while. To do this I use what I refer to as a test card. To make test cards, I stamp a simple image multiple times on a piece of the cardstock recommended for coloring with Copics. I position them in an area about the size of a baseball card and cut apart, allowing room for notes. While working on projects I keep a card near me to practice, test color combinations, experiment with shading as well as testing for streaking or any color irregularities. Notes are written on it so that I can refer to it when working on other projects. The cards are stored on a ring to be kept as a resource for future projects. Below is a sample of my test cards. And yes, Patty Cake makes the perfect image for this.


When I stamp the image for my project, I stamp the image several times onto one page, leaving enough room to cut out the project and allowing for a panel or a scallop circle if needed. If I mess one up beyond repair, I have extras. If all goes well I can spend a quiet evening in front of the TV coloring the remaining images for other projects.

And now for the goodies! Peachy Keen Stamps has generously donated the "In Stitches Face Assortment" for some lucky winner. What do you have to do? Just leave a comment here, then hop on over to my blog, Polka Dot Gypsy and leave me a comment too. On Saturday someone will win this fabulous assortment of faces. Will it be you?


Wow, that was quick. My first day over already. I hope you have enjoyed my projects for my first day as a Guest Designer for Peachy Keen Stamps. It's been a privilage to share them with you and I hope that you will return tomorrow to see what other projects I have to share.

Have a wonderful day and I'll see you all tomorrow when I'll reveal my card for the PKS sketch challenge.

Jane - The Polka Dot Gypsy