Friday, March 30, 2012

You're Cool, Dude! :: Nikki Foraker

Hiya! Nikki here with a card made using the cutest little surfer dude ever! Boogie Board Maxis just, like totally awesome dude! {that was me using surfer lingo} I am just a tad obsessed with paper piecing, so that's what I did with Boogie Board Max. Admittedly it is a time consuming process, but I personally find it incredibly relaxing! And the outcome is just totally tubular! ;) 
I used the Beach Bum collection from Fancy Pants Designs to paper piece him. And that perfect sentiment  is from the Cheep Talk set. I think any little boy {or big boy} would be like totally stoked to get this card in the mail. :)

Have a GREAT day!!!
♥ Nikki ♥ 


Wednesday, March 28, 2012

Easter Blessings :: Raven Baca

Hey everyone! Raven here from Love4stamps and I am so excited to share today's project with you all. I have been staring at these adorable faces for some time and just had to get them out of the package. Did you all know Peachy Keen Stamps has some amazing sentiment stamps? Yup they sure do. 

PK-858 Spring Words 


and the fabulous thing about these stamps is they give you the opportunity to customize them. Yup that's right you can make them say whatever it is your little heart desires. 

There are a few other sets on here two that I will tell you about PK-135 Medium Bear Facial Features and PK-134 Bird Faces and MORE! On top of that I used a fun littlewobble. LOVE those things.
I just love all of these sets and I'm super happy about how this guy looks now that he/she's been gifted a PKS face. This little cutie pie bunny/chick is from 3 Birds on Parade Cricut Cartridge. 

Thank you all so much for stopping by. Hope to see you all soon!!!

Hugs,
Raven

Monday, March 26, 2012

Happy Birthday Critter :: Michelle Criswell

HI Everyone its Michelle from Scrappin with my Bug !!!
 I wanted to share with you a card I made!!!
I used the Wide Eyed and Bushy Tailed face stamp set PK-757 and
the March SOTM PKSC-03 for the Happy Birthday Sentiment !!
Also used was the Art Philosophy cartridge for the card base and a Stinkin Cute
paper piecing cut file for the squirrel and nuts.
With Echo Park paper, twine, my sewing machine and flowers.


I always love to line the inside of my cards as well


I hope you enjoyed this card and thanks so much for stoppin by the Peachy Keen blog !!!

Dont forget to check out the latest challenge over on the challenge blog HERE

Friday, March 23, 2012

Sweet Bunny Thank You :: Cristina Garcia

Hiya There!

It's Cristina from Crafting with Cristina

Today I am sharing you adorable project that I created today using my fave Peachy Keen Stamps.

Lately here in Buffalo, NY the weather has been Beautiful with the temps in the high 70's and Low 80's all week. So in my mind SPRING IS HERE and not a moment too soon.

My favorite part of Spring is the flowers and I love seeing all sorts of wonderful creations using flowers and spring colors. One of the creations that I always see are Flower Pot Shape cards. So I made one for the very first time.


I created this fun shape card from a SVG File from Designs on Cloud 9 The Actual flower pot base opens up like a regular card, instead of sliding like Most Flower pot cards do.

All of the Pattern paper is from Echo Park Walk in the park

The flower base is stamped with PK-565 Mushroom Soup in Stampin Up Crumb Cake ink. You might have to expand the picture to see it, as it's pretty much tone on tone.

The faces on my bunny are from PK-441 Cute and Cuddly 1 1/8" and the  sentiment comes from PK-562 Gnomegrown.

I colored in my little bunnies using my Nectar Prismacolor Pencil and added some Ribbon to each of them, a hair bow for the girl and a bow tie for the boy. Some Pink Baker's twine from Timeless Twine finishes off my card.

I hope you really enjoy this spring card!

Thanks for stopping by today!

Hugs!♥
Cristina

Wednesday, March 21, 2012

Easter Morning :: Lauren Brewer

Hi Peachy friends!  It's Lauren here with an Easter scrapbook layout to share!  I used the super sweet Bunny Dolls Set for this layout.  I love these little bunnies and this set is very versatile - they work perfectly for cards, but are plenty big for a scrapbook layout.  
Bunny Dolls - PK 265
I did a bit of coloring and a bit of paper piecing - I love using up those teeny scraps of pretty paper that would otherwise get thrown away.  I also added a "stitched" border to my layout by threading some baker's twine through my dotted scallop border bunch.  
I love that little vest, and I added a little mini-brad so he would have a button.
Here's a close up of a few of the Easter eggs that I added.  I sized them at 1 1/2" so they would be the same size as the bunny's egg.
If you are interested, I will list a complete material list (including cut sizes) on my blog.  

Thank so much for stopping by today!  I hope you have a great day!  

Monday, March 19, 2012

Peachy Castle Mini :: Melissa Haas

Hello, Melissa here to share my "Peachy Castle" mini album- 
The castle base is pre-cut so you can get right down
to the "fun stuff" of decorating the mini with
your Peachy Keen Stamps. I used PK-640 Princess Face Assortment
for the darling princess faces.  One can enter the castle
if the drawbridge is open OR there is always Rapunzel's braid, hehehe.

I painted the paper for the shingles with Glitter Paint
It adds the perfect light glitter dusting!
Love the goofy face on this crown... It is from
PK-293 The Cornies Assortment
My dragon's eye is
from PK-140 Teddy Bear and Reindeer Face Parts


The bows are from PK-225 Happy Flowers and Cheerful Phrases.
The sweet face on the wand and the sentiment "smile" 
is from the same stamp set.
The paperclip can be removed for a fold out photo mat.

The carriage is a pocket that holds two photo mat tags.

I hope your enjoyed my project today- Thank you so much for stopping by!

Friday, March 16, 2012

Rainbow Birthday :: Kristi Bennett

Hello Peachies!! Kristi here from Little Paper Sprinkles with a super fun card for you today!
I just loved the rainbow in the February SOTM and I have been super anxious to use it! So I finally had the perfect idea, I wanted to layer it!

To start my project I cut a 4 1/4 x 11 piece of cardstock and folded for card base. The Polka dot strips are cut from DCWV All about girls paper pad, I cut them at 1" x 6" and then cut the "banner" cuts layer them on card base and cut according to where I wanted them placed. The Kraft layer underneath the rainbow is cut at 4 1/4 x 2 1/2.

Now onto the Rainbow!!
For the Rainbow I stamped the rainbow 6 times and then each layer I stamped a " different color using the Houndstooth Background from Market Street Stamps, then I cut, inked and layered the pieces on top of each other creating a 3-d effect. I Then stamped the "cloud/beer foam" from the same stamp set and then I just had to add a face from FAVE stamp set "Happy Lashes" The Happy Birthday Sentiment is from the Feb. SOTM!

Then the finishing touches. Add Faux stitching, my fave pen for this is the Gelly Roll Pen, then add buttons! What a fun super cute card! Who doesn't love Rainbows and clouds? :)


Feb. SOTM
PKSC-02 February 2012

Have a PEACHY DAY!!

Wednesday, March 14, 2012

What's Cooking?? Double Layout!! :: Jennie Garcia

Hello!! This is Jennie from Earthy Scrap and I hope you are all having a Peachy Week!!
Strangely these are Christmas Day Photos but this is not a Christmas Themed Layout.
Since this was her star gift that day, I made the layout inspired in the kitchen and, in my head there was this commercial "Let's go out to the kitchen" Have you seen it??
So the inspiration behind that layout is the commercial even though I didn't use the same exactly the same things.

(Click to see larger image)

For the photo doodling I did 3 different style and I paired the colors of the photo mats with a style of doodling. 

All the papers are from Colorbok except the border made with the EK Success Border Punch and the tag, these are K & Company.   
The title I made it with the Birds on Parade Cartridge and I embossed the hat with a Cuttlebug Folder.   
 Okay, here is the surgery method I used to make these yummy creatures. I used the Paper Dolls Everyday Cartridge to cut the legs and arms. I used the doll cut and I snipped the head off, then I did a horizontal cut in the middle separating the arms and legs. I kept the legs together but the upper part of the torso was divided by a vertical cut. This way the arms could be seen and they can be placed where they needed them. I used my Gypsy to determine the size if the paper doll based on the food cut. I made shoes the same size as the paper dolls. Did that made sense??  The apple is from Create A Critter and the Watermelon is from Simply Charmed and for the face I used the Princess Face Assortment.
I jazzed up some of the fruit with twine. For the face of the banana I used the January Stamp Set of the Month. The banana and the milk are from Create A Critter and the soda is from Simply Charmed and the last two faces are from Princess Face Assortment.  
 Some extra details of the layout. 
I hope you liked this layout. 
I love making Peachy Layouts!!
Take Care!!

Monday, March 12, 2012

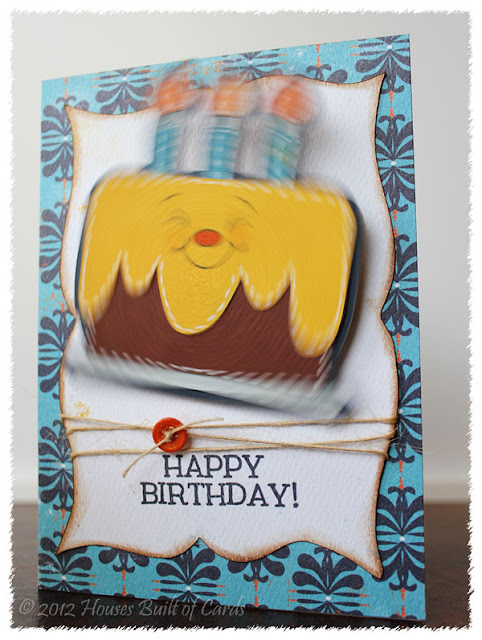
Happy Birthday Cake :: Heather Hoffman

Good morning! It's Heather from Houses Built of Cards with (surprise) a card for you today! This was for my nephew's birthday that we celebrated yesterday! Here is my card:
I used my poor neglected Cricut, and my Everyday Pop-Up Cards for the cake, and Formal Occasion for the frame.  
I added a face (with some Copic highlights) from the Peachy Keen February Kit of the Month: 


And...I put him on an Action Wobble!!! Action Wobbles are also available at Peachy Keen - and they last a long time, so it is a wonderful investment! They add so much fun to a card! Here are a couple shots of it in "action" (hee-hee!):

The sentiment is also from the February Kit - it is amazing to me how versatile these sets are! I don't think I will ever run out of uses for them! I tied some twine from Papertrey Ink, as well as a Papertrey Ink button right above the sentiment, with a simple knot so it is masculine enough. 
All the paper I used is from Authentique - and I inked just the edges of the frame with Tim Holtz distress ink in Tea Dye. 
Thanks so much for visiting today! Hope your week is off to a fabulous start!!!

Sunday, March 11, 2012

Kit Club Changes and Improvements

Good Morning Everyone! The sun is shining here and I cannot wait to start my day (raise your hand if Daylight Savings time always messes you up)! Before I do, though, I just wanted to take a moment to address some questions we've had the last few days regarding our brand new Kit Clubs.

Houston, we have a problem. Wait, do we?

When you signed up for either club, we noted that your card would be charged on the 6th of each month, with kits shipping between the 6th and 10th of each month. While we've kept our promise on the shipping, we think there may have been some confusion based on when we did our sneak peeks.

Our intention was to give people a good week/a week and a half to decide if they wanted to keep their membership for that month. So, we offered the sneak peek between the 21st-25th of February, and then offered the kits as a "single-purchase" option after that. While others who are not enrolled in the club received their kits (because they purchased a la cart and we ship quickly), our kit club members still had to wait until the 6th of March to have their cards charged and have their kits ship out.

Huh? That didn't make sense, we want our kit club members to have them first! We made an honest mistake with timing our release and hope you know there were no bad intentions in doing so. We're going to change this in the future.

This is the third month of our kit clubs, and it's also the first time we've had more than one or two people question when they're shipping. Our membership has skyrocketed over the last month, and while we may have not expected a dramatic increase, we are so excited about it and ready to flex our internal set-up however we need to to keep things running smoothly.

Why we love what we do

You guys are awesome. We've always said we have the best customers, and we really mean it. We know many of you on a first name basis, and enjoy the personal crafty stories you share with us when you call in. If you call in, you'll most likely talk to Kathy, Angelica or Adrianne, and guess what? That's a mom and two daughters. We're not the biggest company out there, but we strive to be the best, and that means admitting when we can improve.

Putting a face to the name:
Kathy
Adrianne
Angelica - that's me!
We will be training two additional employees to help us with customer service. We never want anyone to feel like they're not being attended to, or that their voice isn't important. Heck, we hate poor customer service, and we wouldn't accept it from anyone. We know we can't please all of the people all of the time, and think we do a pretty super job 99% of the time, but we want to do better.

Our stamps are the highest quality available and so is our service. If it's not, we know that you'll let us know, and we strive to rise to the occassion. We're doing this in regard to our kit clubs.

How do I know we'll get better?

  • We'll now be sneak peeking kits just a few days before they're shipped. Kit members will still get the first sneak peek via email on the 1st of each month. Kit members will still be charged on the 6th of the month, with their orders shipping first. 
  • We're working with new a new shipping method so emails are automatically sent out from the program. If you don't receive an email from us, please do check your Spam folder. 
  • We'll be perfecting our kit process prior to training so we can make sure everyone's on the same page
  • We're adding two new areas to our PK Connection (peachykeenstamps.ning.com) to include special areas just for kit members with exclusive perks and premium content.
What do you think?
If there is something we can improve upon, we welcome your suggestions via email - angelica @ peachykeenstamps . com. We take your comments and suggestions seriously and prefer to talk with you about them on a personal basis. 

Thanks for taking a few minutes of your day to read this incredibly long post, you rock for hanging through the whole read! ;) I hope you have an awesome rest of your day!
Angelica

Friday, March 9, 2012

Lucky Banner :: Glorajean Beardall

Hello Peachy Keen Fans. This is Glora from Glora's Crafts and today I have another project using those beautiful 4" faces by Peachy Keen Stamps. I love to make banners for each holiday and I love to have people or animals holding up the banner. I was so excited when the 4" faces came out because now I can make some bigger banners.

Here is what the whole banner looks like:


I know they look tiny on here but those leprechauns are actually about 11.5" tall. Aren't they adorable? They are from the Simply Charmed Cricut cartridge. Here is the first one closer up, I used the Happy Lash Mouth Open With Tongue Out 4" stamp:


And here is the leprechaun on the end, closer up, for him I used the Happy Lashes Mouth Open 4" stamp:


And last of all here is a close up of one of the letters, I used the Lucky Day Shamrockbackground stamp on each of the letters. It makes the perfect St. Patty's Day paper. I REALLY love this background stamp. The shamrocks are from the Designer's Calendar Cricut cartridge and the letters are from Birthday Bash:


I wish you could all see this in person, it is a terrific size with the leprechauns at 11.5" and the shamrocks at 4.5". Anyway, I hope you like it and that it inspires you to try something new and fun. Hugs- Glora