Showing posts with label Guest Designers. Show all posts

Friday, September 30, 2011

Guest Designer Day 5 - Ashley's Scrappin Palace

Welcome Back!!!
I am quite sad that it is my last day here with you on the Peachy Keen Blog, but I have had so much fun this week. I thank you all for supporting me and coming back every day to see my projects.

Today is Lets Face it Friday!! Where you make a project for the challenge and it must include Peachy Keen Faces. 

This Weeks Challenge:
Leaves are starting to fall from the trees, and it's time to get inspired! Using leaves as your inspiration or Focal Point, create a project showcasing your Peachy Keen Faces and the autumn leaves! 
* Design must be new
* Project must include PKS Faces
* Link up by 10/13 - 11:59 CST

My project for this challenge is Layout that I put into a shadowbox and will add one of my Maternity Pictures into when we get them done in November. Enjoy!


Recipe:
PK-450 Wide Eyed Kids Face Assortment
PK-640 Princess Face Assortment
PK-490 Everyday Character Face Assortment
8 x 8 Layout
4 1/4 x 5 1/2 Photo Mat
4 1/2 x 5 3/4 Photo Mat Layer
Leaves @ 5, 5.35, 4.76, 4.88 using Straight from the Nest
Fall @ 1.82 using Straight from the Nest

Leave a comment under this post and I will choose a Random winner tomorrow (Saturday) morning for the Wide Eyed Kids Face Assortment Set. 


Thank You for visiting me this week! I have had so much fun and I hope you have too :)

Thursday, September 29, 2011

Guest Designer Day 4 - Ashley's Scrappin Palace

Happy Thursday!!!
I have been having so much fun making all these Peachy Awesome Projects. Me and my Fiance just had our 9 year anniversary a little over a week ago. I made him a card already but had the thought to make an "I Love You" card for one of my projects. I'm really happy about how it turned out. 


Recipe:
PK-490 Everyday Character Face Assortment
PK-640 Princess Face Assortment
4 1/4 x 5 1/2 Card
4 x 5 1/4 Layer
3 3/4 x 5 Layer 2
EK SUCCESS Photo Label Punch
Boy and Girl @ 3 1/2" using Twinkle Toes
My Creative Time Stamps - Your my best buddy

Don't forget to comment on this post. You must comment on each one of my guest designer posts this week to be in to win Wide Eyed Kids Assortment

I will see you all tomorrow for my last day as Guest Designer and Let's Face It Friday Challenge!!

Wednesday, September 28, 2011

Guest Designer Day 3 - Ashley's Scrappin Palace

Hello Everyone!!!
I can't believe it's already Wednesday! This week is going fast! So, there are about 6 people I know right now that are having babies right before or right after me. It is very exciting! I thought I better get a start on making baby cards. I just got some COPIC markers and figured I would give them a try with my amazing Peachy Stamps :). Hope you enjoy this card!!


Recipe:
PK-245 Baby Monkey
4 1/4 x 5 1/2 Card
4 x 5 1/4 Brown Layer
3 3/4 x 5 Yellow Dot Layer
3 x 3 1/2  White Layer
3 1/4 x 3 3/4 Brown Layer
Cappuccino Twine from The Twinery
3 x 1/2 Banner
Studio G Welcome Baby Stamp
Button

Please leave a comment under this post and on every post this week to be entered to win a set of Wide Eyed Face Assortment Set.

See you back here tomorrow!!

Tuesday, September 27, 2011

Guest Designer Day 2 - Ashley's Scrappin Palace

Welcome back and Happy Tuesday!!!
I am excited to share my project with you today. As some of you may or may not know I am expecting my first Baby in January and am trying to Scrapbook at the same time :). It is a very exciting time for me right now. My baby shower is coming up in less than a month and I decided that I want to make a specific 8 x 8 album for it. I will have tons of family and friends there and want to document it all. I made my first page based on the theme of the Shower and when the time comes I will put a picture of me in the photo spot. 


We are not finding out the gender of our baby until it gets here, so I'm trying to make it as gender neutral as possible without using Light Green and Light Yellow too much.  


Recipe:
PK-754 Critter Faces SET A Medium
PK-490 Everyday Character Face Assortment
8 x 8 Kraft Cardstock Base
7 3/4 x 7 3/4 Layer
5 1/4 x 4 1/4 Photo Mat
5 1/2 x 4 1/2 Photo Mat Layer
Title @ 1" using Don Juan
Monkey @ 3 1/2" using Create A Critter
Umbrella @ 3.59" using Create A Critter
Raindrops @ 5.81 using 3 Birds on Parade
Cappuccino Twine from The Twinery

Don't forget to leave a comment under this post and everyday to be entered to win the fabulous Wide Eyed Kids Face Assortment!!! 


Stop back by tomorrow for more Fun!!! :)

Monday, September 26, 2011

Guest Designer Day 1 - Ashley's Scrappin Palace

Good Morning Everyone and Welcome to Day 1 of my Guest Designer Week. I am Ashley from Ashley's Scrappin Palace. I am so very excited to be posting on the peachy keen blog. Let's get right down to business today. There are a few birthday's in September in our family and I love making everyone their own special cards. My first project is a Birthday card that I made for my Grandma using Wide Eyed Kids.


This weeks giveaway is The Wide Eyed Kids Face Assortment 


Recipe:
PK-451 Wide Eyed Kids 1 1/8
4 1/4 x 5 1/2 Card
4 x 2 Green Layer
4 x 3 1/4 Dots Layer
Cake @ 4" using Smiley Cards
Stardust Stickles
Yellow Ribbon
White Sakura Jelly Roll

Make sure you leave a comment under this post for your chance to win this awesome set of faces. You must come back and comment each day to be entered. You can leave a comment on my blog as well although it is not required. I will choose a random winner on Saturday. 

Come Back tomorrow for more Peachy Goodness!!! :)

Tuesday, September 20, 2011

Polka Dot Gypsy - Guest Designer Day 2

Happy Tuesday everyone and welcome to my second day as Guest Designer! Today at Peachy Keen Stamps it's time for another Sketch Challenge. This one was definitely a tough one for me. The overall card was tall and thin. I chose to keep it that way because it was the one element that was a real challenge for me to overcome. It was a very long process with many changes before I came up with this amazing card. I say it is amazing because with all the changes I made to this card it is amazing that it did not get pitched in the trash! "Patched" Pumpkins" is truly a labor of love.

Patched Pumpkins Card


The finished card size is 4" X 9 1/4". The design theme for this card is patchwork. With the arrival of fall weather I am in a quilting mood. So, I created my challenge card with the feel of an old fashioned quilt. And I think that this card does that with it's earthy tones and hints of patchwork.

Stamp Sets

Cardstock Cutting Dimensions
8" X 9 1/4" - Solid Brown for Card (4" X 9 1/4" folded)
3 3/4" X 9" - Solid Rust for Card Mat
3 1/2" X 8 3/4" - Brown & Orange Polka Dot for Design Panel
2 3/4" X 8 1/8" - Solid Tan (Cut to a point) for Card Design Element
4" Solid Brown Circle for Mat
3 3/4" Yellow Print Circle
Scrap - Solid Rust for Pumpkin Mat
Scrap - Brown Check for Pumpkin
Scrap - Tan Print for Patchwork Pumpkin
Scrap - Rust Print for Patchwork Pumpkin
Scrap - Yellow Print for Patchwork Pumpkin
Scrap - Real Wood Thin Cherry Paper for Sign

Tools, Supplies & Embellishments
Cricut
Cuttlebug
Nestabilities Pumpkins Die
Studio g Bat Punch
Crimper
Beads
Buttons
Twine
Felt Flower
Plaid Paper Nut Cups

Creating the Look of Applique


To create the look of applique on this card I paper pieced the small pumpkins. Using the Halloween Pumpkins from Peachy Keen Stamps, I stamped the image onto the checked pumpkin. I also stamped the same image onto each of the three scraps of print cardstock: tan, rust, and yellow.


Each of the small pumpkins were cut out from the scrap pieces and attached to the checked pumpkin background, covering the stamped image on the background.


I faux stitched along the edges of the circle and large pumpkin. Faux stitching is simply fake stitching. I used a marker to achieve the look of stitching. And to make the stitched circle more uniform I cut a smaller circle and used it as a template to follow while inking the stitches.
I love how paper piecing resembles the applique that I use for quilting. It really is a simple technique with a powerful impact on a card.
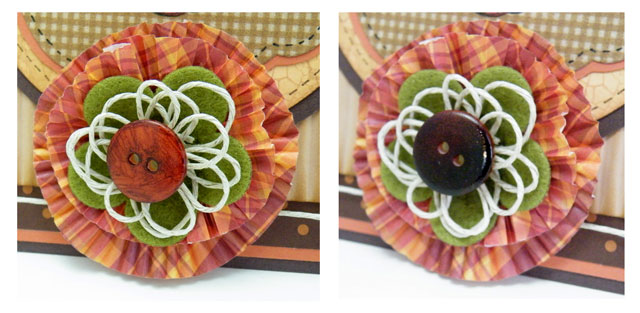
Keeping with the patchwork theme I added a plaid flower. I love to make flowers of all kinds. And I've shared some of those on Polka Dot Gypsy. I hope you'll check them out. But for this card I am trying out another flower technique. I found these paper nut cups at a craft store and new immediately what I was going to do with them. The flower is made from two of these nut cups and is really simple to make.


To make this flower you will need two small paper nut cups and 1 punched circle of any size as the base. Cut the center out from one of the paper cups. Keep the outer ring and throw away the center. You won't need it. I'll refer to this piece as the donut.


Glue the nut cup to the punched circle, scrunching up the center of the cup.


Next, attach the donut piece to the center, scrunching it up as well. Gently gather in the center edges of the donut so that it fits nicely inside the first nut cup layer.


Add a button or two for the center. Once the glue has dried, shape your flower as desired.


Air Brushing verses Coloring

For the flower I wanted a brown button for the center. I didn't have one. So, I used the brush end of my Copic marker to brush on the color, It didn't cover as well as I wanted it to. I used my airbrush and the same marker to color another button. Below is the result. Before on the left and After on the right. Who would have thought that it would make such a big difference.


Rolodex Cards

My second project is a decorative Rolodex card. It can be used the traditional way, keeping important information such as addresses, cell numbers and website information or it can be made into pages for a Rolodex mini album. I'm going to make the mini album to set on my desk.

For this project I cut the Rolodex Cards with my Cricut and faux stitched around the edges. I used double sided cardstock for the card so that I can decorate both sides. I stamped the flower image onto two coordinating prints of cardstock. A 1" circle punch was used to punch out the center of the flower. It was then attached to the center of the coordinating flower. The flower stamp is the Faceless Fall Fun 2 set from Peachy Keen Stamps.


For the back of the card I used the same flower stamp and the same cardstock with the flower and center papers switched for a different look.


This is the perfect stamp to add a face to. This sweet little face is from the In Stitches Face Assortment that I will be drawing for this Saturday. Isn't she just adorable?


Fall Gift Card Holder

For my final project I made this fun little fall gift card holder featuring Halloween Pumpkins, Faceless Fall Fun 2 and the In Stitches Face Assortment stamp sets from Peachy Keen Stamps. The card is made from a small paper bag folded to form a pocket, sewn and decorative panels added. For the front of the card I used the same paper pieced pumpkins that I used for my "Patched Pumpkins" card.


On the back I used the same happy flower from the Rolodex card. 


The card opens up and inside is a pocket to hold a gift card. Please note that the pocket is under the design panel. This photo is misleading. It looks like the pocket is in the flap.


I used a paper bag measuring 4 3/4" X 8 1/2". Folded up the gift card holder measures 3 1/4" X 4 3/4". To make the pocket. just fold the bottom up and stitch along the sides using a sewing machine. Be sure to stitch so that the decorative panels will cover your stitching. Decorate three panels and attach them to the front, back and flap. Secure the ribbon to the bag before attaching the front panel to the bag. Sandwiching the ribbon between the front panel and the bag will hold the ribbon in place and conceal it. On the back I attached the happy flower with pop dots along the upper portion of the flower. This allowed enough room to slide the ribbon up under it before tying. Below is a better photo of the actual pocket. You can see the stitching along the pocket edges.


Wow! I didn't realize I had so much to talk about today. Now, don't forget that on Saturday I'll be drawing a name for the set I've been using today, the In Stitches Face Assortment. Peachy Keen Stamps has so generously donated this stamp set and some lucky winner will get it on Saturday. Will it be you? To win, leave a comment here and on my Patched Pumpkins post at the Polka Dot Gypsy.

I hope you enjoyed today's projects. Again it has been a privilege to share my paper crafting with all of you. Have a wonderful day!

Jane - the Polka Dot Gypsy

Monday, September 19, 2011

Polka Dot Gypsy - Guest Designer Day 1

Good morning everyone. Today begins my week as Guest Designer for Peachy Keen Stamps. I am so excited to be sharing with you all the fun projects that I've been working on. So, lets get started!!!

Tissue Cover


My first project is a decorative cover for the square box of facial tissue. Please note that because of the size of the scarecrow image I had to turn the box on its side. If using a smaller image, the box can be placed in it's normal, upright position. The cover was made with kraft paper used for mailing packages. The tissue box was wrapped and then tied with a ribbon made of brown tulle. The kraft paper was not attached to the box so that replacement boxes can slide easily in and out. Spider web edges were created using the Martha Stewart Spider Web punch. However, the spider web edging has a tendency to catch on the box flaps. So, caution is needed when changing boxes. Below is a photo of the side opening of the tissue cover. You can see how the pointy edges can catch on the tissue box.


For the front panel I stamped the "Happy Scarecrow" image from Peachy Keen Stamps. The image was colored with Copic Sketch markers.


I wanted the scarecrow panel to be the focal point of this project. So, I choose a more plain, patchwork type of panel for the top. I used the Nestabilities Pumpkin die and the Cuttlebug to create this cute polka dot pumpkin. A simple circle punch was used to create the moon and Vintage Photo Distress Ink was used around the edges to add a little dimension to it. I found this cute little bat punch from Studio g. It made the perfect accent for the harvest moon. The final accent is a ribbon tied around the fall paper.


Tools & Supplies

Copic Markers
Ranger Distress Inks
Tuxedo Black Memento Ink
Studio g Bat Punch
Martha Stewart Spider Web Edge Punch
1 1/4" Circle Punch
Nestabilities Pumpkin Die
Cuttlebug
1/4" Off White Ribbon
Strip of Brown Tulle
Kraft paper used for mailing packages
Various solids and patterns of cardstock and paper


Happy Scarecrow Variations


For this card I used the Pumpkin Nestabilities die to cut out the Happy Scarecrow image. For the rick rack I used the Rick Rack die cut from Cottage Cutz.


I used a lot of layers for this card and added some faux stitching around the center panel. The added bow embellishment was made from raffia.


For the final card I machine stitched around the edges of the center panel. The rosette was made using the Tim Holtz Mini Paper Rosette die. The rosette was added to fix a blending experiment gone bad.


Copic Tips

I always loved the results that other crafters were getting using Copic markers and I just had to give it a try. I've been using them for a few years now and still consider myself a beginner. I know the basics and can use them, but alas I am a rebel and tend to break the rules. Sometimes that gets me into trouble. In the case of Copics, I blend colors not in the same family. Most, no probably all, of the blending that I did on this project is outside the blending families. Sometimes it worked and sometimes it didn't. So, here are a couple things that I do to help me when I am using my Copics.

Before I start a new project I like to warm up a little before coloring my actual image, especially if I haven't colored for a while. To do this I use what I refer to as a test card. To make test cards, I stamp a simple image multiple times on a piece of the cardstock recommended for coloring with Copics. I position them in an area about the size of a baseball card and cut apart, allowing room for notes. While working on projects I keep a card near me to practice, test color combinations, experiment with shading as well as testing for streaking or any color irregularities. Notes are written on it so that I can refer to it when working on other projects. The cards are stored on a ring to be kept as a resource for future projects. Below is a sample of my test cards. And yes, Patty Cake makes the perfect image for this.


When I stamp the image for my project, I stamp the image several times onto one page, leaving enough room to cut out the project and allowing for a panel or a scallop circle if needed. If I mess one up beyond repair, I have extras. If all goes well I can spend a quiet evening in front of the TV coloring the remaining images for other projects.

And now for the goodies! Peachy Keen Stamps has generously donated the "In Stitches Face Assortment" for some lucky winner. What do you have to do? Just leave a comment here, then hop on over to my blog, Polka Dot Gypsy and leave me a comment too. On Saturday someone will win this fabulous assortment of faces. Will it be you?


Wow, that was quick. My first day over already. I hope you have enjoyed my projects for my first day as a Guest Designer for Peachy Keen Stamps. It's been a privilage to share them with you and I hope that you will return tomorrow to see what other projects I have to share.

Have a wonderful day and I'll see you all tomorrow when I'll reveal my card for the PKS sketch challenge.

Jane - The Polka Dot Gypsy

Monday, September 5, 2011

Guest Designer Week 44: Crafting with Cristina Day 1


HIYA!!!!!
                                             ***AND HAPPY LABOR DAY*****
It's Cristina here from Crafting with Cristina and welcome to my Peachy keen Stamps Guest Designer week. I am so excited to share some fun peachy projects with you this week.

For Today's project I created a layout, because I'm very very behind on my scrapbook pages (aren't we all??)

IMG_20110904_230209
The Whole Layout
I decided to create an Easter scrapbook page. Since I only have 1 picture of my daughter with the Easter bunny this year I opted to create a layout centered around the 5x7 print. I am a steadfast believer of making simple quick yet adorable layouts and this project came together in a total of 45 Mins. I don't have much time to craft, so I have to monopolize on what time I do have. :)


For this project I used the PK-44 Cute and Cuddly Faces 1 1/8” Stamp Set along with Lettering Delights Peep SVG Set (for the adorable bunny and hop hop hop title)

I didn't have any “seasonal” Paper so I used what I had on hand an older DCWV All about Girls pattern paper stack because of the fun assortment of colors.

All of the hearts were hand cut using the old fashioned fold-a-paper-in-half-and-cut-half a-heart technique using scissors, I used my Sakura white Gelly roll pen and some Glitter Glue to dress them up a bit

IMG_20110904_230228
Hand-cut Hearts
The Picture from the Mall orginally came with a horrible ugly border that I couldn't match to anything so the easiest thing for me to do, was just cut it off, and create my own photo mats, which the largest is 5x7 (kraft)

It's pretty simple to see what I did here. I made sure to add entirely too much doodling, I always get carried away once I start... :-P


Materials Used
  • (1) 12x12 Kraft Cardstock, Recollections
  • (1) 10x10 Pattern Cardstock, DCWV
  • (1) 4x12 Pattern Cardstock, DVWV
  • IMG_20110904_230237
    Journal Area, hand cut heart on the Bunny's Egg
    (2) 2x12 Punched -Fiskars Scallop Punch- Purple Cardstock
  • (1) Photo mat Kraft 5x7
  • PK-44 Cute and Cuddle Faces 1 1/8 Stamp Set
  • Lettering Delights Peep SVG Set
    • Title Cut at around 8 inches
    • Bunny Cut at 6 inches
  • Scrappy Moms Stamps: The Charmed Life Stamp Set
    • Some-bunny Loves you
  • (1) 3x5 Peach Cardstock for Journal Tag
  • (1) 3.25x5.25 Cardstock for Journal Tag Mat
  • Hot off the Press Journaling Stencil for Brackets
  • Saelyn Opal Craft Glitter Glue, (from Michaels)
  • Sakura Gelly Roll Pen
  • We r Memory Keepers Corner Chomper
  • We r Memory Keepers Crop a Dile
I hope you enjoyed today's Project. I was a blast to make.

This weeks Giveaway sponsored by Peachy Keen Stamps is an Everyday Faces Parts 4 to 5 inches. My Go-to set when I need a quick cute face on just about any project.
The great thing about this set is you can make ANIMAL FACES too :)

for a chance to win all you need to do is leave a comment with a way to contact you, you can also leave a comment on my blog Crafting with Cristina if you'd like as well. Make sure you come back tomorrow for another Peachy Project (Tuesday Challenge) as well as another chance to win this adorable Stamp Set.

have a great day!!!


Friday, August 12, 2011

PKS Guest Designer Week 30 Day 5 with Gaby

Welcome to the Peachy Keen Stamps Home Blog
and to my last day as a Guest Designer!

I am still excited and feel honored to have been given this Awesome Opportunity!

It is my hope that I have inspired at least one visitor to use Peachy Keen products
in a different or new way that they had used them before!

For my last post I decided to create something fun!
 A Tic Tac Toe game!


 The green look brighter than it really is..
 It is a magnetic dry erase board
 Every piece you see including the title has magnet on the back (thinking on creating another game to use here- that way my grand daughters can play different games).
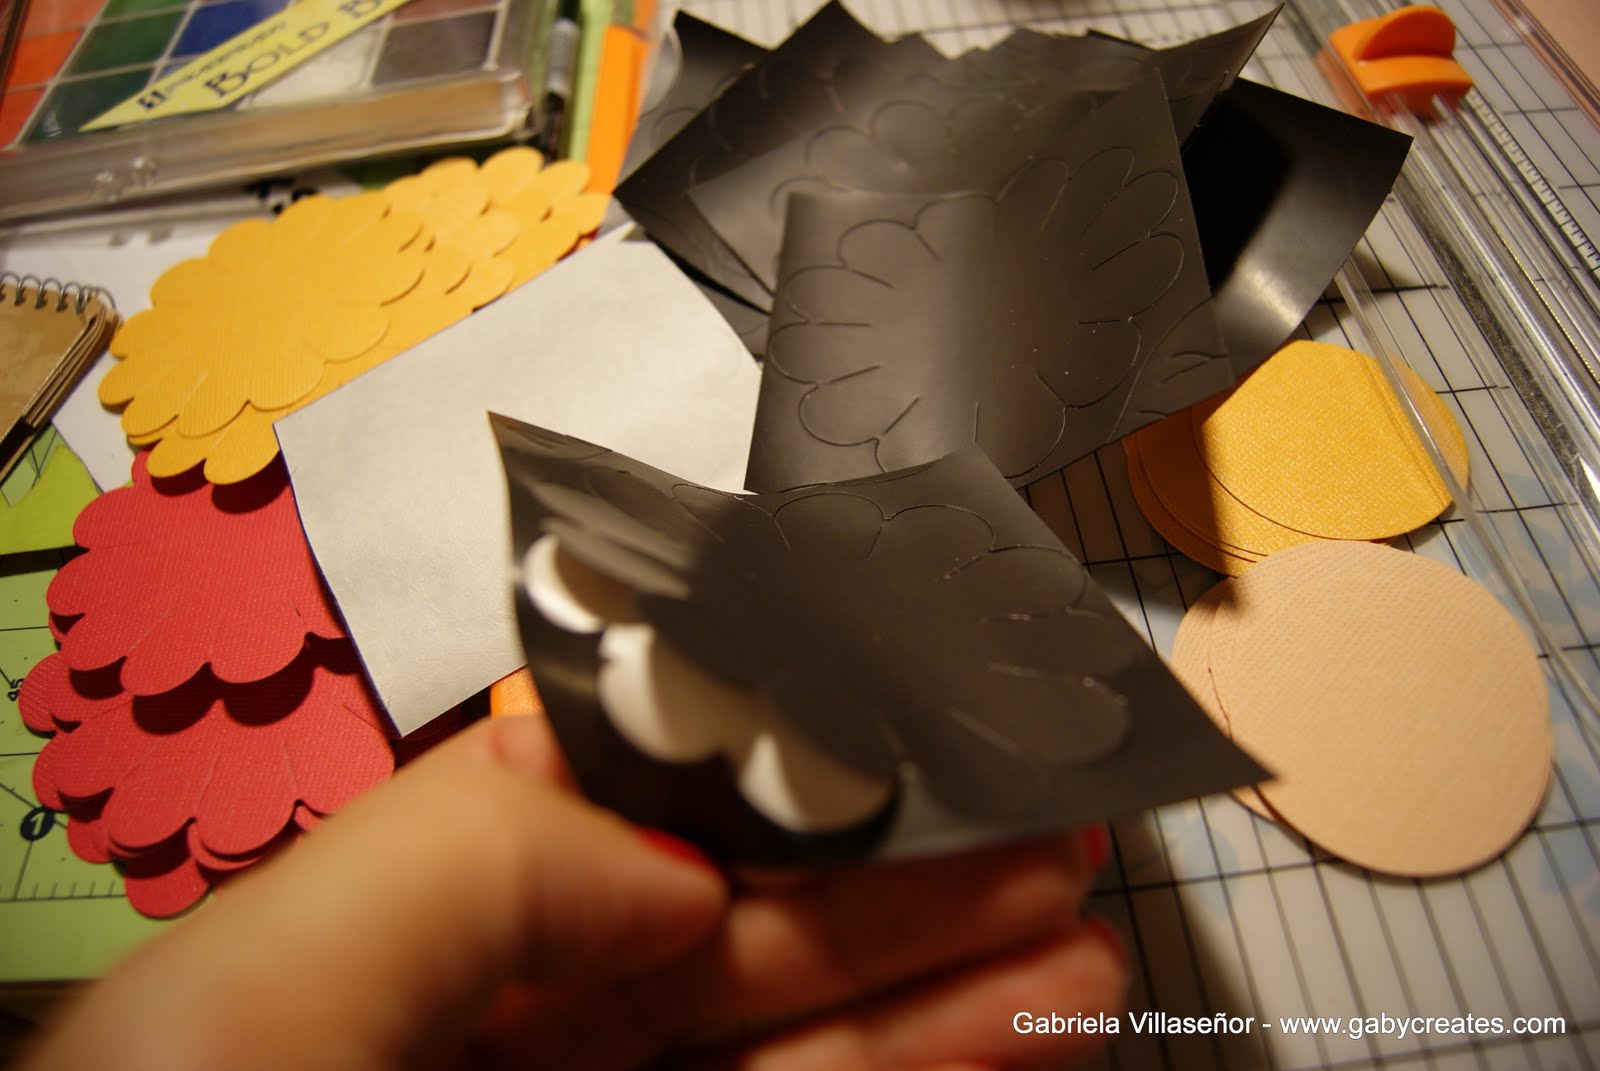
 Here you see how the dies cut through card stock and thin magnet sheets.
Here you can see that by running it through the die cutting machine it only cuts through the magnet and not the paper attached to the magnet sheet.  I purchased a roll 12"x24" at Michaels for under $5 and used less than 8"x12".
This project was inspired by a project Deanna Misner created for the Cricut Circle blog.

Remember if you leave a comment on any post here and on my blog, it gives you one entry each!

For Monday's post click {HERE}
For Tuesday's post click {HERE}
For Wednesday's post click {HERE}
For Thursday's post click {HERE}


Items Used this week found at the PKS Store:


Thanks so much for visiting and taking the time 
to leave a comment!
 (I read and enjoy them all!)

If you leave a comment here and on my blog (GabyCreates) on every post this week, you will have 10 chances to win my all time favorites! (I have new found loves, but non the less, this set is my all time favorite)

PK-490 Everyday Character Face Assortment


That PKS has so graciously donated for me to give away! – All comments posted ‘till midnight PST on Friday August 12, 2011 (TODAY) on either blog or both will qualify.