Hello!
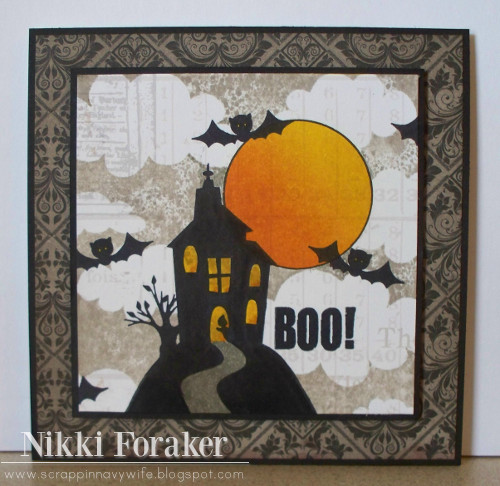
Nikki here with a photo tutorial on masking. The bright green paper is Post-It Craft Paper. It's sticky all over like a Post-It note. I stamped the haunted house from the
September 2012 set and drew in a bigger hill with pencil. I used a circle die to cut out a circle that will become my moon. So I have now made two masks. I'm using patterned paper from the September
Peachy Picks Kit.
I used the
Cloudy Day Background stamp to make a spooky sky. I inked it up with pumice stone distress ink and misted it with water in a mini mister to get a splotchy look. I think it adds to the spooky factor.
I removed the circle mask and added the "negative" mask. Now it's time to color the moon.
I inked the moon with distress inks in mustard seed, wild honey, and ripe persimmon. I blended the colors on with an ink blending tool and the blending foam pad. I then drew around the circle with a black marker to make it stand out from the background. Remove the mask and this is what we have...
Bam! A spooky moon! :) And now it's time to stamp some more...
I know this looks a little crazy, but it will turn out cool...I swear! I cut a longer sidewalk out of the "negative" mask so I could have a gray sidewalk. Inked over it with a black marker. And from there I did some trimming and some more stamping and here is the finished card...
Tada! What started off looking crazy came together. I stamped some bats from the
Dress Me Ghost set. And the sentiment is from the
September 2012 set.
The patterned papers are from the September
Peachy Picks Kit. The gray was just a little off from the ink I used, but no problem, I just inked right over it with distress ink for a perfect match. And here is another card I did using this same technique...
For this one I used a larger circle for the moon, but everything else is the same. I stamped the witch from the
September 2012 on the moon I created by masking.
I hope you enjoyed my little tutorial on masking! Have a Perfectly Peachy day!