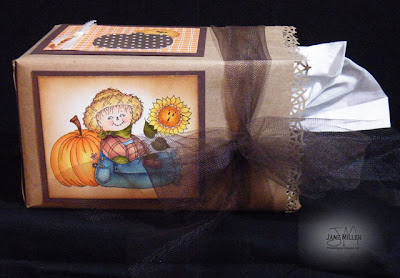
Tissue Cover
My first project is a decorative cover for the square box of facial tissue. Please note that because of the size of the scarecrow image I had to turn the box on its side. If using a smaller image, the box can be placed in it's normal, upright position. The cover was made with kraft paper used for mailing packages. The tissue box was wrapped and then tied with a ribbon made of brown tulle. The kraft paper was not attached to the box so that replacement boxes can slide easily in and out. Spider web edges were created using the Martha Stewart Spider Web punch. However, the spider web edging has a tendency to catch on the box flaps. So, caution is needed when changing boxes. Below is a photo of the side opening of the tissue cover. You can see how the pointy edges can catch on the tissue box.
For the front panel I stamped the "Happy Scarecrow" image from Peachy Keen Stamps. The image was colored with Copic Sketch markers.
I wanted the scarecrow panel to be the focal point of this project. So, I choose a more plain, patchwork type of panel for the top. I used the Nestabilities Pumpkin die and the Cuttlebug to create this cute polka dot pumpkin. A simple circle punch was used to create the moon and Vintage Photo Distress Ink was used around the edges to add a little dimension to it. I found this cute little bat punch from Studio g. It made the perfect accent for the harvest moon. The final accent is a ribbon tied around the fall paper.
Tools & Supplies
Copic Markers
Ranger Distress Inks
Tuxedo Black Memento Ink
Studio g Bat Punch
Martha Stewart Spider Web Edge Punch
1 1/4" Circle Punch
Nestabilities Pumpkin Die
Cuttlebug
1/4" Off White Ribbon
Strip of Brown Tulle
Kraft paper used for mailing packages
Various solids and patterns of cardstock and paper
Happy Scarecrow Variations
For this card I used the Pumpkin Nestabilities die to cut out the Happy Scarecrow image. For the rick rack I used the Rick Rack die cut from Cottage Cutz.
I used a lot of layers for this card and added some faux stitching around the center panel. The added bow embellishment was made from raffia.
For the final card I machine stitched around the edges of the center panel. The rosette was made using the Tim Holtz Mini Paper Rosette die. The rosette was added to fix a blending experiment gone bad.
Copic Tips
I always loved the results that other crafters were getting using Copic markers and I just had to give it a try. I've been using them for a few years now and still consider myself a beginner. I know the basics and can use them, but alas I am a rebel and tend to break the rules. Sometimes that gets me into trouble. In the case of Copics, I blend colors not in the same family. Most, no probably all, of the blending that I did on this project is outside the blending families. Sometimes it worked and sometimes it didn't. So, here are a couple things that I do to help me when I am using my Copics.
Before I start a new project I like to warm up a little before coloring my actual image, especially if I haven't colored for a while. To do this I use what I refer to as a test card. To make test cards, I stamp a simple image multiple times on a piece of the cardstock recommended for coloring with Copics. I position them in an area about the size of a baseball card and cut apart, allowing room for notes. While working on projects I keep a card near me to practice, test color combinations, experiment with shading as well as testing for streaking or any color irregularities. Notes are written on it so that I can refer to it when working on other projects. The cards are stored on a ring to be kept as a resource for future projects. Below is a sample of my test cards. And yes, Patty Cake makes the perfect image for this.
When I stamp the image for my project, I stamp the image several times onto one page, leaving enough room to cut out the project and allowing for a panel or a scallop circle if needed. If I mess one up beyond repair, I have extras. If all goes well I can spend a quiet evening in front of the TV coloring the remaining images for other projects.
And now for the goodies! Peachy Keen Stamps has generously donated the "In Stitches Face Assortment" for some lucky winner. What do you have to do? Just leave a comment here, then hop on over to my blog, Polka Dot Gypsy and leave me a comment too. On Saturday someone will win this fabulous assortment of faces. Will it be you?
Wow, that was quick. My first day over already. I hope you have enjoyed my projects for my first day as a Guest Designer for Peachy Keen Stamps. It's been a privilage to share them with you and I hope that you will return tomorrow to see what other projects I have to share.
Have a wonderful day and I'll see you all tomorrow when I'll reveal my card for the PKS sketch challenge.
Jane - The Polka Dot Gypsy


41 comments:
love both and the card is definitly saying Fall. My favorite time of year.
love these adorable cards!! TFS
jessica
chick-n-scrap.blogspot.com
Love what you did with the scarecrow. These projects are too cute.
Beautiful work! Love all the scarecrow images!
Hugs,
Saundra :)
Really cute projects! Love these critter faces. I never saw them before. Thanks for the chance :)
I want to find a tissue box and make one per season / holiday now. tfs!! I LOVE my PKS stamps!! this new set is ADORABLE! tfs a giveaway
parkernana5@cox.net
super cute.
marial302003@yahoo.com
WONDERFUL job - thanks for the Copic tips! I am DEFINATELY still a beginner and try to soak up all the information I can get on them!!!
housesbuiltofcards@gmail.com
www.housesbuiltofcards.blogspot.com
Love your Cards and that Tissue Box is Awesome!!!! Love It! Thank You for Sharing your talents with us. Oh, How I would (LOVE) to win the PK Stamps. They are so Cute! :0)
cindymarshall63 at hotmail dot com
Very cute! Thanks for giving some tips on the Copics.
Great scarecrow projects and thanks for the coloring tip.
slrdowney at hotmail dot com
This is great Jane! What a wonderful and informative post!!
What great stamps! They would make adorable faces for my Halloween Cards.
Great cards-thanks for the hint with the copics!
I would so love these! Thanks for the coloring tips!
OMG...EVERYTHING is just SUPER CUTE! I love the tissue box idea!
I absolutely love your projects. I never thought about covering a tissuebox. Genius!
Yay Jane, it's your turn!!!! You did a gorgeous job on your tissue box and cards. Each one was a joy to look at. I also appreciate the Copic tips. Everyone has their own styles and methods. I think your projects come out beautiful and will definitely take any tips since I just started 'trying' to play with Copics! Hugs- Glora
Your box cover and cards are super cute!! Great job! Loved the Copic tips also.
kissmyjen at gmail.com
justcreativeme.blogspot.com
TY For the tips!! Cute cards!
kacee
love your idea on how you work with the copics. Cute Scare crow Tissue cover.
Dawn RI
abosoffit@hotmail.com
Hi! I love your scarecrows, the coloring is beautiful. I haven't tried Copics because of the cost. But, I do love seeing what all the talented crafters create with them! TFS
lflinesatcomcastdotnet
What a smart cookie, stamping extra images. I do that too and so when I need a stamped image its ready and all I need to do is color it.
Sew Sweet N Crafty
SewSweetNCrafty.blogspot.com
great project and cards. tfs.
I love the scarecrow in the pumpkin! So cute!
ra6352 (at) gmail (Dot) com
Wow, that tissue box is so adorable. That would make such a great teacher appreciation gift.
The tissue box is amazing!! What a great idea!!
my-o-scrappin.blogspot.com
smmyiow@gmail.com
Thanks for the copic tip. Love the tissue box cover.
Cute cards and projects!!! Thanks for the inspiration!
amyis300 AT hotmail DOT om
scrapthissavethat.blogspot.com
Adorable! The tissue box is amazing! Love th scraecrow! Gotta love PKS! TFS CallyAnn
Love your tissue box and card. What a great tip when coloring. I'll have to keep that in mind. Smooches... Felicia - frankleecrafts [at] gmail [dot] com
Such cute scarecrows!!
The projects are all great what a bunch of women you have to design and show what your stamps can do to a simple card or layout.
patricia_letsdon@hotmail.com
Thanks for the great idea and coloring tips!
Great projects...I love the spider web punch...hope I can still find one. I love to see how different the cards look using another paper combo.
quilt 4 fun 2 at hot mail dot com
Love these! You are SO talented! I haven't gotten into the coloring aspect of stamping yet as I'm fairly new to it but your work definitely pushes me closer :) Thank you so much!
Jenny
papercraftjenny at gmail dot com
Love the tissue box!
tamluvsrog@sbcglobal.net
What a cute way to cover a tissue box, and what to say about your cards, they are so cute! Thank you for sharing both your projects and tips about coloring with copic, I might give them a try ;) have a g teat day!
Liz
Great job and I do NOT consider you a beginner with Copics..
Corinne
ronnienadcorinne@sbcglobal.net
wishuponascrap.blogspot.com
Love your projects. My favorite is the card with the Raffia bow.
thanks for the coloring tips.
Kathy
http://3spoileddogs.blogspot.com/
amazing tissue box cover, and your cards are so cute!!! alisha.moorenielsen@gmail.com
http://scrappin-happens.blogspot.com/
Post a Comment