


Patched Pumpkins Card

The finished card size is 4" X 9 1/4". The design theme for this card is patchwork. With the arrival of fall weather I am in a quilting mood. So, I created my challenge card with the feel of an old fashioned quilt. And I think that this card does that with it's earthy tones and hints of patchwork.
Stamp Sets
Cardstock Cutting Dimensions
8" X 9 1/4" - Solid Brown for Card (4" X 9 1/4" folded)
3 3/4" X 9" - Solid Rust for Card Mat
3 1/2" X 8 3/4" - Brown & Orange Polka Dot for Design Panel
2 3/4" X 8 1/8" - Solid Tan (Cut to a point) for Card Design Element
4" Solid Brown Circle for Mat
3 3/4" Yellow Print Circle
Scrap - Solid Rust for Pumpkin Mat
Scrap - Brown Check for Pumpkin
Scrap - Tan Print for Patchwork Pumpkin
Scrap - Rust Print for Patchwork Pumpkin
Scrap - Yellow Print for Patchwork Pumpkin
Scrap - Real Wood Thin Cherry Paper for Sign
Tools, Supplies & Embellishments
Cricut
Cuttlebug
Nestabilities Pumpkins Die
Studio g Bat Punch
Crimper
Beads
Buttons
Twine
Felt Flower
Plaid Paper Nut Cups
Creating the Look of Applique

To create the look of applique on this card I paper pieced the small pumpkins. Using the Halloween Pumpkins from Peachy Keen Stamps, I stamped the image onto the checked pumpkin. I also stamped the same image onto each of the three scraps of print cardstock: tan, rust, and yellow.

Each of the small pumpkins were cut out from the scrap pieces and attached to the checked pumpkin background, covering the stamped image on the background.

I love how paper piecing resembles the applique that I use for quilting. It really is a simple technique with a powerful impact on a card.
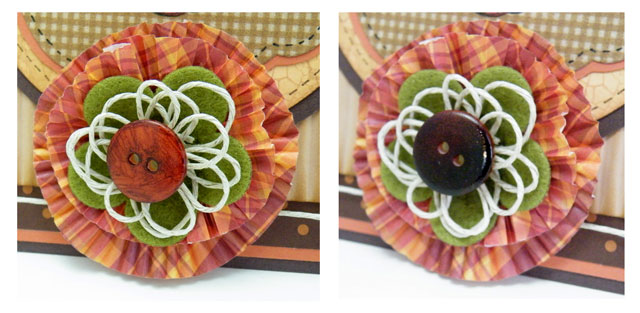
Keeping with the patchwork theme I added a plaid flower. I love to make flowers of all kinds. And I've shared some of those on Polka Dot Gypsy. I hope you'll check them out. But for this card I am trying out another flower technique. I found these paper nut cups at a craft store and new immediately what I was going to do with them. The flower is made from two of these nut cups and is really simple to make.


Next, attach the donut piece to the center, scrunching it up as well. Gently gather in the center edges of the donut so that it fits nicely inside the first nut cup layer.

Add a button or two for the center. Once the glue has dried, shape your flower as desired.

Air Brushing verses Coloring
My second project is a decorative Rolodex card. It can be used the traditional way, keeping important information such as addresses, cell numbers and website information or it can be made into pages for a Rolodex mini album. I'm going to make the mini album to set on my desk.
For this project I cut the Rolodex Cards with my Cricut and faux stitched around the edges. I used double sided cardstock for the card so that I can decorate both sides. I stamped the flower image onto two coordinating prints of cardstock. A 1" circle punch was used to punch out the center of the flower. It was then attached to the center of the coordinating flower. The flower stamp is the Faceless Fall Fun 2 set from Peachy Keen Stamps.

For the back of the card I used the same flower stamp and the same cardstock with the flower and center papers switched for a different look.

This is the perfect stamp to add a face to. This sweet little face is from the In Stitches Face Assortment that I will be drawing for this Saturday. Isn't she just adorable?

Fall Gift Card Holder

On the back I used the same happy flower from the Rolodex card.

The card opens up and inside is a pocket to hold a gift card. Please note that the pocket is under the design panel. This photo is misleading. It looks like the pocket is in the flap.


Wow! I didn't realize I had so much to talk about today. Now, don't forget that on Saturday I'll be drawing a name for the set I've been using today, the In Stitches Face Assortment. Peachy Keen Stamps has so generously donated this stamp set and some lucky winner will get it on Saturday. Will it be you? To win, leave a comment here and on my Patched Pumpkins post at the Polka Dot Gypsy.
I hope you enjoyed today's projects. Again it has been a privilege to share my paper crafting with all of you. Have a wonderful day!
Jane - the Polka Dot Gypsy

26 comments:
WOW!! What an amazing project!
Love the fall colors and all the cute extra details!
TFS
jessica
chick-n-scrap.blogspot.com
All of your projects were wonderful...so much detail and a great job explaining it all. I love the colors you picked and the quilting idea :D
quilt 4 fun 2 at hot mail dot com
Oh my gosh, your projects are AMAZING! Beautiful work! I love the colors and the patchwork look. Gorgeous!
Jenny
papercraftjenny at gmail dot com
I love the idea of using the paper sack to create this project!
Great Project! Thanks for sharing!
Wow, This is Fabulous. You are gettin' down with your guest week. Can't wait to see what's next. Smooches... Felicia - frankleecrafts [at] gmail [dot] com
Wow, that is all very cute. How long did that take you? Great job, love it.
Sew Sweet N Crafty
SewSweetNCrafty.blogspot.com
super cool card love it
You have some many great ideas!
kissmyjen at gmail.com
justcreativeme.blogspot,com
So adorable!
tamluvsrog@sbcglobal.net
WOW, these projects are awesome, I like the way you airbrushed the button for your card and the materials you used for the flower, clever! The Rolodex project looks awesome too and the unexpected material used as the base for the gift card holder opened a new world of possibilities for the always trusty brown paper bag, Thank you again for sharing, have a wonderful day.
Liz
Gosh, your projects are just great, you are so creative, thank you for sharing them.
Love this card! The flower is awesome!
ra6352 (at) gmail (dot) com
I love fall although it is always late getting to Phoenix. Fall colors are my favorite so of course I love the choice of colors in your card. It gives me hope that one day it will cool off here.
WOW...this is just AWESOME! I love all these ideas, the pumpkins are ADORABLE!
so cool! LOve the gift card holder!
kacee
Fabulous patchwork projects today--I enjoyed them all.
slrdowney at hotmail dot com
I love it!! The cupcake flowers are awesome!! What a great idea!! Thanks for sharing your amazing talent!!
my-o-scrappin.blogspot.com
smmyiow@gmail.com
Wow, WoW, WOW!!! These projects are AMAZING!!!! I am totally going to use that nut cup flower idea. It is absolutely inspired. You have more talent in your little pinky then I will probably ever possess! I am loving your week and all the hard work you have put into it! Until tomorrow ... Hugs- Glora
I'm loving the tutorials!!
amyis300 AT hotmail DOT com
scrapthissavethat.blogspot.com
Oh my heck! adorable and so very fun! TFS CallyAnn
Oh my this is GREAT... just LOVE the nut cup flower Idea! might have to lift that idea..
Corinne
ronnieandcorinne@sbcglobal.net
wishuponascrap.blogspot.com
Wow, I really love all your projects. The nut cup flower and paper baf gift holder idea are genius!!
Kathy
http://3spoileddogs.blogspot.com/
Completely amazing again Jane!!!
I love your card it's amazing!!! thank you for the idea of making your flowers with wrappers. that is great.
alisha.moorenielsen@gmail.com
http://scrappin-happens.blogspot.com/
Thanks for all the amazing ideas.
Post a Comment